![]()
Deprecated
Now available Spring Framework: Persistence & Transaction – Web & JSP
This is the second tutorial working with SpringSource Tool Suite, in this time I am going to teach you how create a simple Spring MVC application. If you are a beginner with SpringSource Tool Suite, then I suggest you read before the first tutorial about Getting Started with SpringSource Tool Suite. If you are a beginner with Spring Web MVC, then be sure to read first this 16. Web MVC framework.
![]()
The SpringSource‘s developer team given us a powerful option within SpringSource Tool Suite to make our development cycle easier, this option is called Spring Template Project where within this option we have some defined templates where these are based on specific Spring Projects.
The purpose of each template according its own type is create a project with some default configuration settings in your favor to avoid repeat always the same configuration settings process when you create the same project’s type each time. For example, the project is going to be created including all the mandatory Maven dependencies, of course, it depends of the Spring Project type chosen, furthermore, including some basic configuration settings and Java code. Even more, for example, the template based on MVC (covered later in this tutorial), is already created with the classic directory structure for Java Web Applications (WEB-INF etc).
Again, I am going to work with Linux Fedora Core 15, and with Java SE Development Kit 6 Update 29.
Note: In many of the follow images you are going to realize that many of them has been captured on Windows. It is due that Linux cant capture some desired screens and futhermore I am including some detailed instructions for your favor.
OK Let’s go!. Startup your SpringSource Tool Suite 2.8.1
Step 01: Creating a Spring Template Project
Once started up the IDE simply do the follow. File->New->Spring Template Project.

Figure 01: Creating a Spring Template Project
Step 02: Creating a Spring MVC Project
Once has selected the Spring Template Project option then you must now select a Template. Since this tutorial is based on MVC, therefore select the item Spring MVC Project. Below an image which show all the rest of the Templates available.
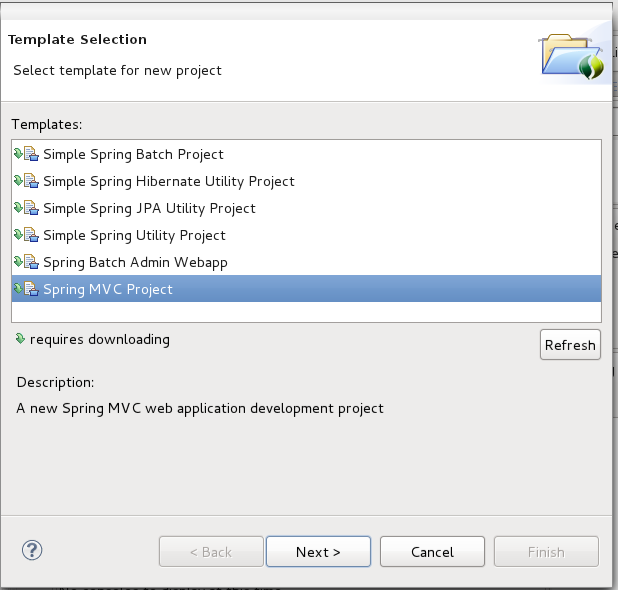
Figure 02: Creating a Spring MVC Project
Do realize yourself that each item has in the left part a green row. In the same image you can see the description of the green row, which means requires downloading. It only happen just only one time when you create a project the first time based on a specific template, and it is to get the desired template.
OK, from our previous image proceed to do click in the button Next >. Since it going to be our first time that we create a project based in this type of template we are going to receive the follow message. See below the respective image.

Figure 03: Downloading the Spring MVC Project Template
Proceed to do click in the button Yes. This downloading process should be very quickly.
Step 03: Defining the Project Settings
The next step is simply write the project name and define the top-level package. For each one respectively I am going to use manolitomvc and com.manuel.jordan. Below an image for a better understanding.
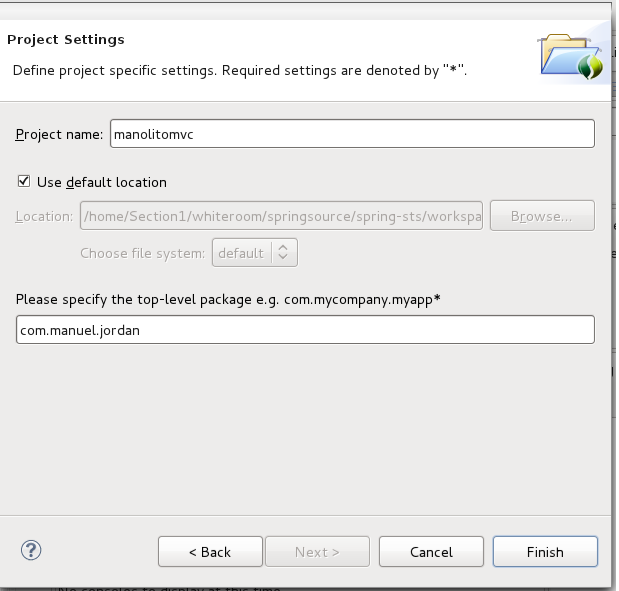
Figure 04: Project Settings for the Spring MVC Project
Once you have written these values, proceed to do click on the button Finish. With all these instructions, we have created our Spring MVC Project. Below an image showing part of the whole project structure.

Figure 05: Spring MVC Project created
Do realize yourself that the project directory structure is based on Apache Maven and you can see part of the Web directory structure too. In the next image you can see a little more expanded this structure

Figure 06: Spring MVC Project Web directory structure
Note: Some times, not always!, due the Spring Core dependencies managed by Maven, more details soon!, you could get an error in your project directory. See the next image for a better understanding.

Figure 07: Spring MVC Project with error
If you got this error, dont worry, just ignore it by the moment, later on Step 05, you are going to learn how to eliminate this error.
Step 04: Disabling the option Build Automatically (Optional)
It is my own opinion, but I think is wise disable the option Build Automatically for our IDE to avoid some problems when you are editing your code. To disable this feature, just do the follow Project->Build Automatically. Below an image showing this option enabled yet. when you have finished to do my instruction, the black row must disappear.
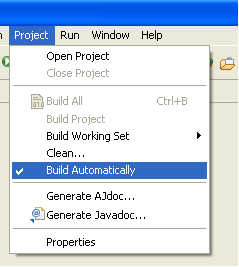
Figure 08: Option Build Automatically enabled
Step 05: Configuring pom.xml
It is an important step for our consideration. Open the file named pom.xml, it must be located in the bottom of the directory structure, see Figure 07. While I am writing this tutorial the latest current release but not stable of Spring Core is 3.1.0.RC2.
Once opened this file, practically in the top you are going to find the follow line:
<spring.framework.version>3.0.6.RELEASE</spring.framework.version>
Spring Core 3.0.6.RELEASE is the latest stable current release. For this tutorial I am going to work with Spring Core 3.1.0.RC2. Therefore update the line shown above in this way:
<spring.framework.version>3.1.0.RC2</spring.framework.version>
Due this update we now must include a repository in to our pom.xml file to let our project get the Spring Core dependencies, otherwise we are going to get problems.
	<repositories>
		<repository>
			<snapshots>
				<enabled>false</enabled>
			</snapshots>
			<id>org.springframework.maven.milestone</id>
			<name>Spring Maven Milestone Repository</name>
			<url>http://maven.springframework.org/milestone</url>
		</repository>
	</repositories>
Until this point you can save the pom.xml file. In this point the IDE must try to get the Spring Core dependencies for the version 3.1.0.RC2.
Note: Like I said before, perhaps you get an error in your project directory. I think due the Spring Core dependencies managed by Maven. See the next image for a better understanding.
Figure 09: Spring MVC Project with error
Ok, to fix this, just do the follow. Select the project directory manolitomvc, see the previous image, and then do Project->Clean….

Figure 10: Cleaning a Project (Part 01)
Afterwards to do this, you should get the follow screen.

Figure 11: Cleaning a Project (Part 02)
Since our IDE has been installed and it is our first project, therefore has sense only see one project. Just select our project through the checkbox, to do this, before you must do click in the radio button named Clean projects selected below and later be sure to uncheck the checkbox named Start a build immediately. To understand these instructions see the follow image.

Figure 12: Cleaning a Project (Part 03)
Once you got the previous screen in your IDE, proceed to do click in the button OK. The error still yet, then be sure you have selected our project directory and then do the follow Project->Build.
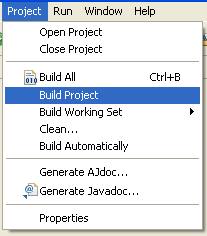
Figure 13: Building a Project
Afterwards to do this, the error has gone. Below the final result.

Figure 14: Spring MVC Project without error
Step 06: Editing our @Controller (Optional)
This step is optional, be free to skip it.
Note: Again, if you are a beginner with Spring Web MVC, then be sure to read first this 16. Web MVC framework.
Go to src/main/java and expand the package com.manuel.jordan and open the HomeController.java file.

Figure 15: Opening the HomeController.java file
Once opened this class you must see the complete source code. Below I am showing part of the HomeController source code.
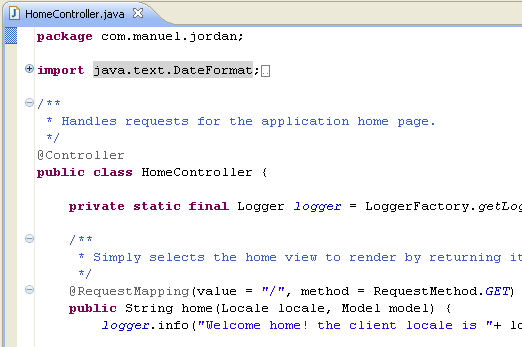
Figure 16: HomeController’s source code (Partial view)
In this class, we have the unique method named home. In this method we have this line of code:
model.addAttribute(“serverTime”, formattedDate );
Just below of such line write this new one.
model.addAttribute(“welcomeMessage”, “Welcome To Manuel’s Sample Application” );
The final result must be like the follow image

Figure 17: HomeController’s home method edited
Step 07: Showing Line Numbers (Optional)
If you did realize yourself, we have not line numbers in our HomeController source code. Therefore to make our development work easier, lets activate it. Just do right click in the left part of the window where appear the HomeController source code and select Show Line Numbers. Below an image for a better understanding.

Figure 18: Activating Line Numbers within HomeController
Once activated this option you are going to see the line numbers within the HomeController class, even more, you going to see this feature for all the files in your IDE (practically for all your projects), such as .java files, .jsp files, .xml files, .properties files. See the follow image where HomeController is visible now with the line numbers in the left part.

Figure 19: Line Numbers Included within HomeController
Step 08: Editing our JSP file (Optional)
Once edited our HomeController class, now we must edit the home.jsp file. To do this, go to src/main/webapp/WEB-INF/views and open the home.jsp file.

Figure 20: Opening the home.jsp file
Once opened this file, you must see the complete source code.
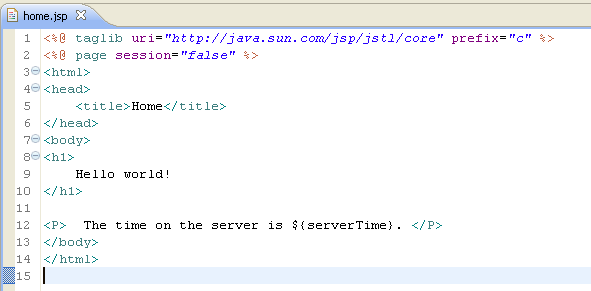
Figure 21: home’s source code
In this JSP file, we have this line of code:
<P> The time on the server is ${serverTime}. </P>
Just below of such line write this new one.
<P> ${welcomeMessage} </P>
The final result must be like the follow image

Figure 22: home’s source code edited
Step 09: Opening the Servers View to configure the VMware vFabric tc Server Developer Edition
After to have edited our source code, we are able to execute it. Before to do this, be sure to Build our application to reflect these two editions. Select the project directory and then do the follow Project->Build. See Figure 13 located in the Step 05 for a better understanding.
SpringSource Tool Suite 2.8.1 has included by default the VMware vFabric tc Server Developer Edition v2.6. Perhaps you cant see this server in your IDE, because the Servers view is not visible yet. If you have this situation, just do the follow Window->Show View->Other…

Figure 23: Opening Servers View (Part 01)
Then go to the Server directory and select the unique item named Servers and finally do click in the button OK.

Figure 24: Opening Servers View (Part 02)
Once done this, you must see the VMware vFabric tc Server Developer Edition v2.6 within the Servers view like the follow image.

Figure 25: Servers View
If you see again the Figure 23, notice that Servers option already appear, well some times no appear, that’s why I am teaching you in this way.
Step 10: Configuring the VMware vFabric tc Server Developer Edition
Once we are able to see the Servers view we can configure our VMware vFabric tc Server Developer Edition v2.6 to work with our Spring MVC application. To do this, in the VMware vFabric tc Server Developer Edition v2.6 proceed to do right click and select the item named Add and Remove….

Figure 26: Selecting the Add and Remove… option
Once done this, perhaps you would see the project manolitomvc in the left part named Available. If it is the case just select the project and do click in the button Add >. Now our project manolitomvc must be located in the right part named Configured. For the moment keep checked the checkbox named If server is started, publish changes immediately. See the follow image to understand the final configuration. Once done this, proceed to do click in the button Finish

Figure 27: Moving the manolitomvc project to the Configured section
Step 11: Starting the VMware vFabric tc Server Developer Edition
With the previous configuration, our manolitomvc project is able to be considered to be developed by the VMware vFabric tc Server Developer Edition v2.6.
Therefore we are now able to startup the server. To do this, again in the VMware vFabric tc Server Developer Edition v2.6 proceed to do right click and select the item named Start.

Figure 28: Starting VMware vFabric tc Server Developer Edition v2.6 (Way 01)
Other way to startup the server is doing click in the green circle icon located in the right part, see the follow image the red circle which contains this icon.

Figure 29: Starting VMware vFabric tc Server Developer Edition v2.6 (Way 02)
Once given the order to startup the server in either of the two forms available, you should see the follow output.

Figure 30: VMware vFabric tc Server Developer Edition v2.6 Started
Step 12: Opening the Internal Web Browser
Once started the server, our IDE should automatically open the Internal Web Browser view. If it is not the case, do the follow Window->Show View->Other….
Figure 31: Opening Internal Web Browser View (Part 01)
Then go to the General directory and select the unique item named Internal Web Browser and finally do click in the button OK.
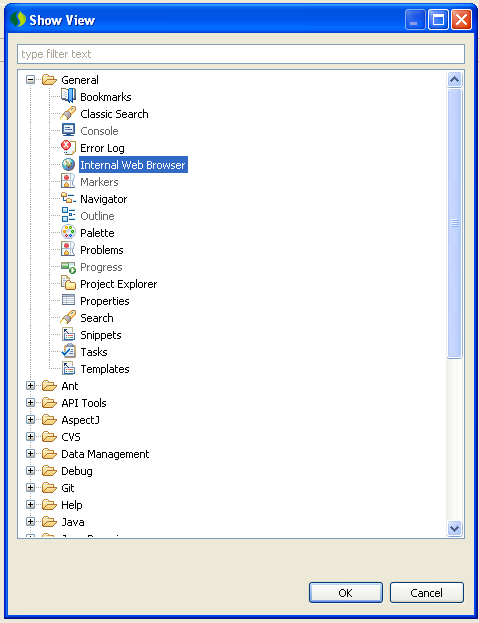
Figure 32: Opening Internal Web Browser View (Part 02)
Step 13: Running our Spring MVC application
Once you got the Internal Web Browser view, write the follow URL http://localhost:8080/manolitomvc/ and press enter or do click in the green triangle located in the right part. When you have done either these two options to execute the URL. You should get the follow output.

Figure 33: Running manolitomvc application
Notice the Console View output, we have a logs INFO message. It is in color black.

Figure 34: Running the manolitomvc application
Each time you execute the URL, a new logs INFO message should appear.
Step 14: Shutdown the VMware vFabric tc Server Developer Edition
If you recall, in the Step 11, we are able to startup our server in two ways, in the same way, we can shutdown our server in two ways.
The first way is the follow, again in the VMware vFabric tc Server Developer Edition v2.6 proceed to do right click and select the item named Stop.

Figure 35: Shutdown VMware vFabric tc Server Developer Edition v2.6 (Way 01)
The second way to is doing click in the red square icon located in the right part.

Figure 36: Shutdown VMware vFabric tc Server Developer Edition v2.6 (Way 02)
Once stopped the server, in the Console view you must see some log messages indicating that the server was shutdown successfully (I am not posting an image about this).
Step 15: Exporting manolitomvc.war file
The last step of this tutorial is export the .war file of our project. I am going to use this .war for other tutorials. To export our project do right click in the project directory and choice the item Export….

Figure 37: Exporting manolitomvc.war file (Part 01)
Once done this, go to the Web directory and select the item WAR file and do click in the button Next >.

Figure 38: Exporting manolitomvc.war file (Part 02)
Now do click in the button Browse… and select the destination, I am going to use my Desktop. Leave the rest of the options without changes. Below the image with the final result.
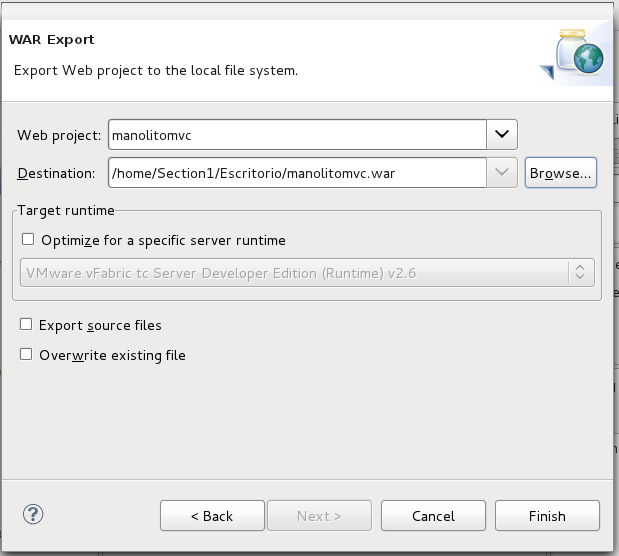
Figure 39: Exporting manolitomvc.war file (Part 03)
Once done this, just do click in the button Finish
Final Notes: Congratulations!!!. You have learned how create a Spring MVC application, configure our IDE, edit the project’s source code , startup and shutdown the VMware vFabric tc Server Developer Edition v2.6 and finally how to export a .war file.
In the coming tutorials I am going to use this .war file. Be ready!

It would be great if maven packed all dependencies (jars) so that it could also run in a plain tomcat instance.
can you point me a tutorial that shows how to do that?
Hello Jorge
If you did follow the tutorial, check the .war file exported. It already included all the .jar files imported and handle by Maven through the dependency declarations.
Therefore when you drop the .war file into the webapps into your Apache Tomcat you are going to see in the project’s lib directory the jars file
I will write perhaps a simple tutorial about how to get and configure Apache Tomcat in Linux. Something simple.
HTH
Indeed, they are. thanks for this wonderfull tut.
Thanks for putting those screenshots
You’re welcome
Enjoy the tutorial
Thanks Manuel, you have done a fantastic job explaining how to use the SpringSource tool. I spent a lot of time beating about the bush until I found you on the net. I will follow the rest of your tutorial as I find them very educative.
Thanks a lot.
Hi Andy
Thanks a lot for your kind words, I appreciate, is nice receive some thanks
I am happy to know my work is useful for you, thats why I wrote detailed tutorials, I remember when I started to learn some topic and the documentation some times lack of details.
Next month I should start to write more tutorials.
Best Regards
dude, u save my life. this is the only site where i found how to use the spring tool suite from scratch for a MVC project. Not even in the official site they have a tutorial like this. Well done
Hello
That’s the idea, “save …”, give an excellent material for the beginners. I remember when I started in this journey and well… in some way was painful.
Best Regards!
Hi Manuel,
Great tut, but i am having difficulty getting the vm fabric server to start – these are the errors i am getting
Publishing the configuration…
Error copying file to C:/springsource/vfabric-tc-server-developer-2.6.1.RELEASE/spring-insight-instance/backup\catalina.policy: C:\springsource\vfabric-tc-server-developer-2.6.1.RELEASE\spring-insight-instance\conf\catalina.policy (The system cannot find the path specified)
C:\springsource\vfabric-tc-server-developer-2.6.1.RELEASE\spring-insight-instance\conf\catalina.policy (The system cannot find the path specified)
Error copying file to C:/springsource/vfabric-tc-server-developer-2.6.1.RELEASE/spring-insight-instance/backup\catalina.properties: C:\springsource\vfabric-tc-server-developer-2.6.1.RELEASE\spring-insight-instance\conf\catalina.properties (The system cannot find the path specified)
C:\springsource\vfabric-tc-server-developer-2.6.1.RELEASE\spring-insight-instance\conf\catalina.properties (The system cannot find the path specified)
Error copying file to C:/springsource/vfabric-tc-serv…..
Fixed – configured the runtime environment to point to the correct directoty
What did you do before? to get your previous errors
Nice, perfect for my school task Spring MVC 😉
Hi Thomas
Even if you got the solution, is really important you must understand the reason of the things.
Hi there. After Figure 13, I still got errors. Do you have any thoughts on why is this so? Thanks. 🙂
Hello Aki
Re install the STS in other directory. Your case is rare.
I have deleted your two other post.
Kind Regards
Thanks Manuel. I will try this.
Thanks!! great explanation. I got it to work without errors!. I have experiencie with Java and Eclispe but just starting with Spring, so I appreciate it.
Hi Franjo
You’re welcome
Good to know the tutorial is useful
Thanks for the tutorial. It is much appreciated.
You’re welcome. Enjoy it!
This was very helpful though I have enough experience with eclipse to skip most of it. I found a maven build was normally enough but I needed a maven install before running on the server
Excellent tutorial! I was able to configure Tomcat and run the demo application in the Internal Browser. Are the follow on tutorials not available yet?
Hi Bill
Glad to know all work for you, about the future tutorials, I am busy right now, I need some hours to write detailed tutorials. But they will come!
Hi Manuel, Thanks a lot for sharing. Keep up the good work. You have a new follower.
Hi Alejandro
You’re welcome
Thanks for your thoughts!
Great tutorial!Thank you very much!
You’re welcome, enjoy it!
Thanks a lot Manuel, very useful and easy to follow tutorial.
Hi Sheri
You’re welcome
Thank you for this great tutorial. I followed the steps you specified up to Opening Internal Web Browser View. However, I got Embedded browser not available. Problem details: The embedded browser widget for this editor cannot be created….
I opened Eclipse ->preferences ->general -> web browser, the internal web browser is disabled,
I have STS all in one 3.1.0 based on eclipse 4.2.1 installed on a VirtualBox with Centos 6.3 OS.
I searched internet, only to find confusing answers. Some saying need to install XULRUNNER, some saying need to install the right version of FireFox, or Mozilla…
Would you please help me understand what is going on and how to fix it?
Hello Lin
Your case is weird…I dont use the internal web browser…
just other like FF, Chrome etc…
Thank You Manuel! You did a much greater job explaining than official spring tutors.
Thank You Jared….
Hi,
Great tutorial…..I am faceing one issue like whenever server start I am geting error like ” An internal error occurred during: “Starting SpringSource tc Server v6.0 for VMware Workstation at localhost”.
Handle not initialized.”
Thanks in advance.
Hello..
Try re installing the IDE….
Thank you so much, Manuel.
After torturing myself for 30+ minutes watching the SpringSource ‘Introduction to SpringSource Toolkit’ tutorials I was about to give up and go back to php programming. Then I found this simple and straightforward tutorial on SpringMVC and it’s all so much clearer now. Thanks again!
Hello Mike
I am happy to know my work was really useful for you…
Thanks for your kinds words…
Kind Regards!
This was extremely helpful, thank you!
Thank You Jack!
Hi Tutor,
Very very nice tutorial this is …extremely well work done..
I create my new Spring MVC project in a very first instance as i am new to this….
I’ll bring you a beer if you meet..
Thank You Buddy ….!!!
Hi Dharmendra
Thanks for your kinds words…I appreciate
Kind Regards!
Good Tutorial..Thank you very much!
Thank You.
Hi,
When I select new template project, I get the following error
Error while downloading or parsing descriptors file ‘http://dist.springsource.com/release/STS/help/descriptors-3.0.xml’:
org.eclipse.core.runtime.CoreException: Error while retrieving http://dist.springsource.com/release/STS/help/descriptors-3.0.xml
Hello Pandian
It is a weird error, try to do the same process again…
I never had such kind of error…
Maven repository link is broken.
Rajath
Hello Rajath
Which link?, post it
Thank You.
thanx buddy..very nice tutorial and very helpful..keep it up
Hi Shantanu
Thank You.
Hi manuel,
Thanks a lot for your great tutorial 🙂
Regards,
Charan
Hi Charan
You’re welcome…
Hi, thx for tutorial but I have a few problems ;/
When I create new Spring MVC Template Project, I have errors in controller file and in view file.
In HomeController I have in import commands (org.springframework.stereotype.Controller, org.springframework.ui.Model, org.springframework.web.bind) that they cannot be resolved.
In home.jsp I have error in command: ” that ‘Can not find tag library descriptor’.
Why? 😦
Hello Chuck
Such type of errors is about the Maven dependencies, don’t forget to update the spring framework dependency to 3.2.3.RELEASE, save the file, let STS download the maven dependencies, then do a clean and rebuild the project
HTH
This is by far the best tutorial I have EVER seen on getting spring mvc up and running. If I would have had this at my fingertips a year ago I would have gone spring mvc instead of Tapestry 5. I don’t mean that as a bash on Tapestry. Making my new app now in spring mvc, was a breeze with this and already got AngularJS up and running as well and talking back and forth with the controllers. Next is spring data with mongo…if you know a good tutorial that is like this one for that please chime in…THANK YOU!
Hi Eric
Really happy with your kind words…
Thank You..
Hi, My STS is deploying in wtpapps, when I copy the folder to webapps everything runs normally. Great tutorial !
This is the only tutorial which helped me to run my first Spring based web application.
Thanks a lot.
Could you also please create tutorial on deploying this web application to Google app engine.
Thanks by your kind words..
i have purchased pro spring book and download springblog aplication in STS 3.4.0,when i run it shows following error :
1:java.lang.ClassNotFoundException: org.springframework.instrument.classloading.tomcat.TomcatInstrumentableClassLoader
2:org.apache.catalina.LifecycleException: Failed to start component [StandardEngine[Catalina].StandardHost[localhost].StandardContext[/springblog]]
3:java.lang.IllegalStateException: ContainerBase.addChild: start: org.apache.catalina.LifecycleException: Failed to start component [StandardEngine[Catalina].StandardHost[localhost].StandardContext[/springblog]]